In this beginner-friendly tutorial, we will be building a basic TicTacToe game that can be played by two players who are connected using Waku.
What is Waku
Waku is a family of robust, censorship-resistant, and privacy-preserving communication protocols designed to enable perfomant messaging for web3 apps. When I say ‘messaging’, this does not restrict Waku’s use cases just to building ‘text’ messaging apps; Waku can also support other use cases like games, marketplaces, governance tooling, and much more.
If you wish to know more about what Waku offers - check out the website or developer documentation.
Why Waku for building a Tic-Tac-Toe game?
A Tic-Tac-Toe game is one of the most straightforward project ideas that can be implemented with Waku. This is because it involves just two players and has minimal web3 jargon. Implementing the game is very clear for anyone with prior experience in building with React-based frameworks and some enthusiasm to learn Waku.
Getting started with building
Prerequisites
- Some intermediate-level knowledge of React based frameworks (in this tutorial, we use NextJS)
- Understanding of Waku's architecture
- Some coffee to sip along
Wireframing
Before we start, let us visualise the project's wireframe for a better understanding:
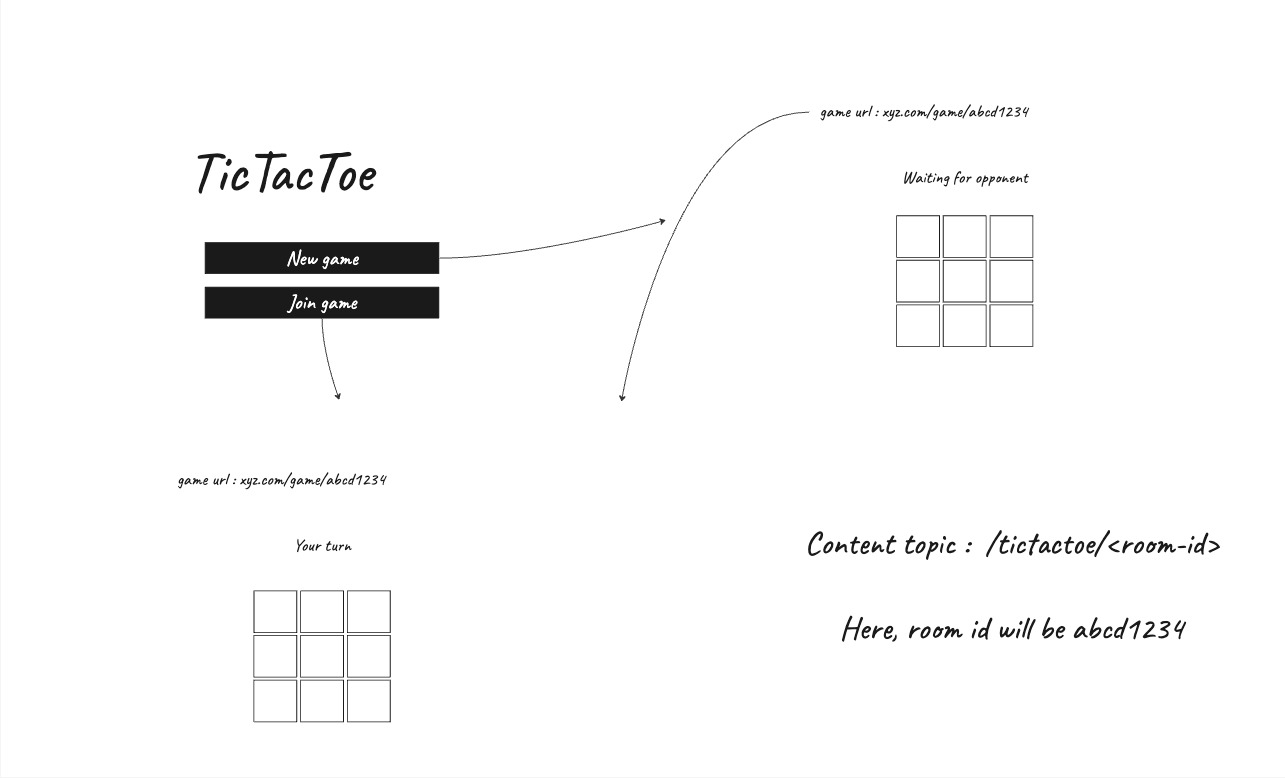
The first screen on the left will be our landing screen with two buttons for starting a new game or joining an existing one. Each of the games in our TicTacToe game will have a room-id which two players will be connected to.
Waku follows a 'content topic based architecture', meaning that the messages are routed and stored based on different content topics across the network. In our case, the content topic would be the room-id since it maps perfectly. Two players in a game will be connected by publishing on and subscribing to the same content-topic/room-id.
Do not worry if you need clarification about this - you can figure it out in the next steps as you build the project.
Step 1 : Create a NextJS project
Kickstarting a new NextJS project is super easy by using the command below:
npx create-next-app@latest TicTacToe --eslint
Make sure to select Y in the command line when you are prompted if you require TailwindCSS. Alternatively, please follow the instructions for installing TailwindCSS in this link.
Once you are done, you should be able to run the NextJS app by using the command npm run dev
Step 2 : Organising the file structure
The file structure for this project is very easy to setup. Create a folder called /components in the root directory of the project. Inside the components folder, create four files:
Header.js: Contains the header componentHero.js: Screen which appears on the menu asking if you wish to create a new game or join an existing gameLoading.js: Loader componentRoom.js: This file will hold all the Waku and game logic
Apart from the above files, you must create a new folder inside the /pages folder with the name /pages/game. Inside the game folder, create file called [id].js which will be used to navigate a user to a particular game room.
Step 3 : Install the @waku/react SDK
Now, it is time to install the required libraries for using Waku by using the following command:
npm install @waku/react @waku/sdk protobufjs
Apart from these, we will also need a few more libraries that can be helpful during the next steps :
npm install short-unique-id copy-to-clipboard
short-unique-id will be useful in generating a random unique id for the game room. copy-to-clipboard will help us implement a button that can copy the room ID to a user's clipboard.
Step 4 : Importing the SDK and initialising the providers
Inside the /pages folder, you can find _app.js file, which is the starting point of a NextJS app. We will be initialising our provider here so that the Waku provider will wrap up the entire application.
So, import the following on top of your file :
import { LightNodeProvider } from "@waku/react";
import { Protocols } from "@waku/sdk";
Now, wrap the components with the <LightNodeProvider> as follows :
    <LightNodeProvider
      options={{ defaultBootstrap: true }}
      protocols={[Protocols.Store, Protocols.Filter, Protocols.LightPush]}
    >
      <Component {...pageProps} />
    </LightNodeProvider>
This provider allows the usage of Store, Filter and LightPush protocols which will be helpful in implementing all the required functionalities of our game.
Step 5 : Modify the index.js file
The index.js file inside the /pages folder renders the index route of the application. Let's make it display our components Header and Hero respectively,
import Head from 'next/head'
import Hero from '@/components/Hero'
import Header from '@/components/Header'


export default function Home() {

  return (
    <>
      <Head>
        <title>Tic Tac Toe</title>
        <meta name="description" content="Tic Tac Toe game created with Waku" />
        <meta name="viewport" content="width=device-width, initial-scale=1" />
        <link rel="icon" href="/favicon.ico" />
      </Head>
      <main className='bg-black h-screen'>
        <Header />
        <Hero />
      </main>
    </>
  )
}
Step 6 : Header component and Hero component
The header component will carry a logo on the left and a button with the link to our Github on the right end:
Header.js
import Link from 'next/link'
import React from 'react'

export default function Header() {
    return (
        <div className='flex p-5 justify-between items-center'>
            <Link href="/">
                <div id='logo'>
                    Your-Logo
                </div>
            </Link>
            <a href='https://github.com/hackyguru/tictactoe' className='text-white flex space-x-3 items-center cursor-pointer'>
                <p>GitHub</p>
            </a>
        </div>
    )
}
Remember to replace 'Your-Logo' with your application's logo.
Hero.js
The Hero component will allow users to create or join a new game. When a user creates a new game, a unique room ID is generated using theshort-unique-id package. In case users want to join an existing game, they can enter the room ID to join in.
import React, { useState, useEffect } from 'react';
import Loading from './Loading';
import ShortUniqueId from 'short-unique-id';
import Router from 'next/router';
export default function Hero() {
const options = { length: 8 };
const uid = new ShortUniqueId(options);
const [room, setRoom] = useState(null);
const [game, setGame] = useState(null);
const [joinLink, setJoinLink] = useState('');
useEffect(() => {
if (room === null) {
setRoom(uid.rnd());
}
}, []);
if (room === null) {
return <Loading />;
}
const handleNewGameClick = () => {
sessionStorage.setItem('roomId', room);
sessionStorage.setItem('player', 'x');
Router.push(`/game/${room}`);
};
const handleJoinGameClick = () => {
setGame('join');
};
const handleJoinLinkChange = (e) => {
setJoinLink(e.target.value);
};
const handleJoinButtonClick = () => {
Router.push(`/game/${joinLink}`);
};
const handleGoBackClick = () => {
setGame(null);
};
return (
<section id='hero'>
<div className="mx-auto max-w-screen-xl px-4 lg:flex lg:mt-40 lg:items-center mt-40">
<div className="mx-auto max-w-xl text-center">
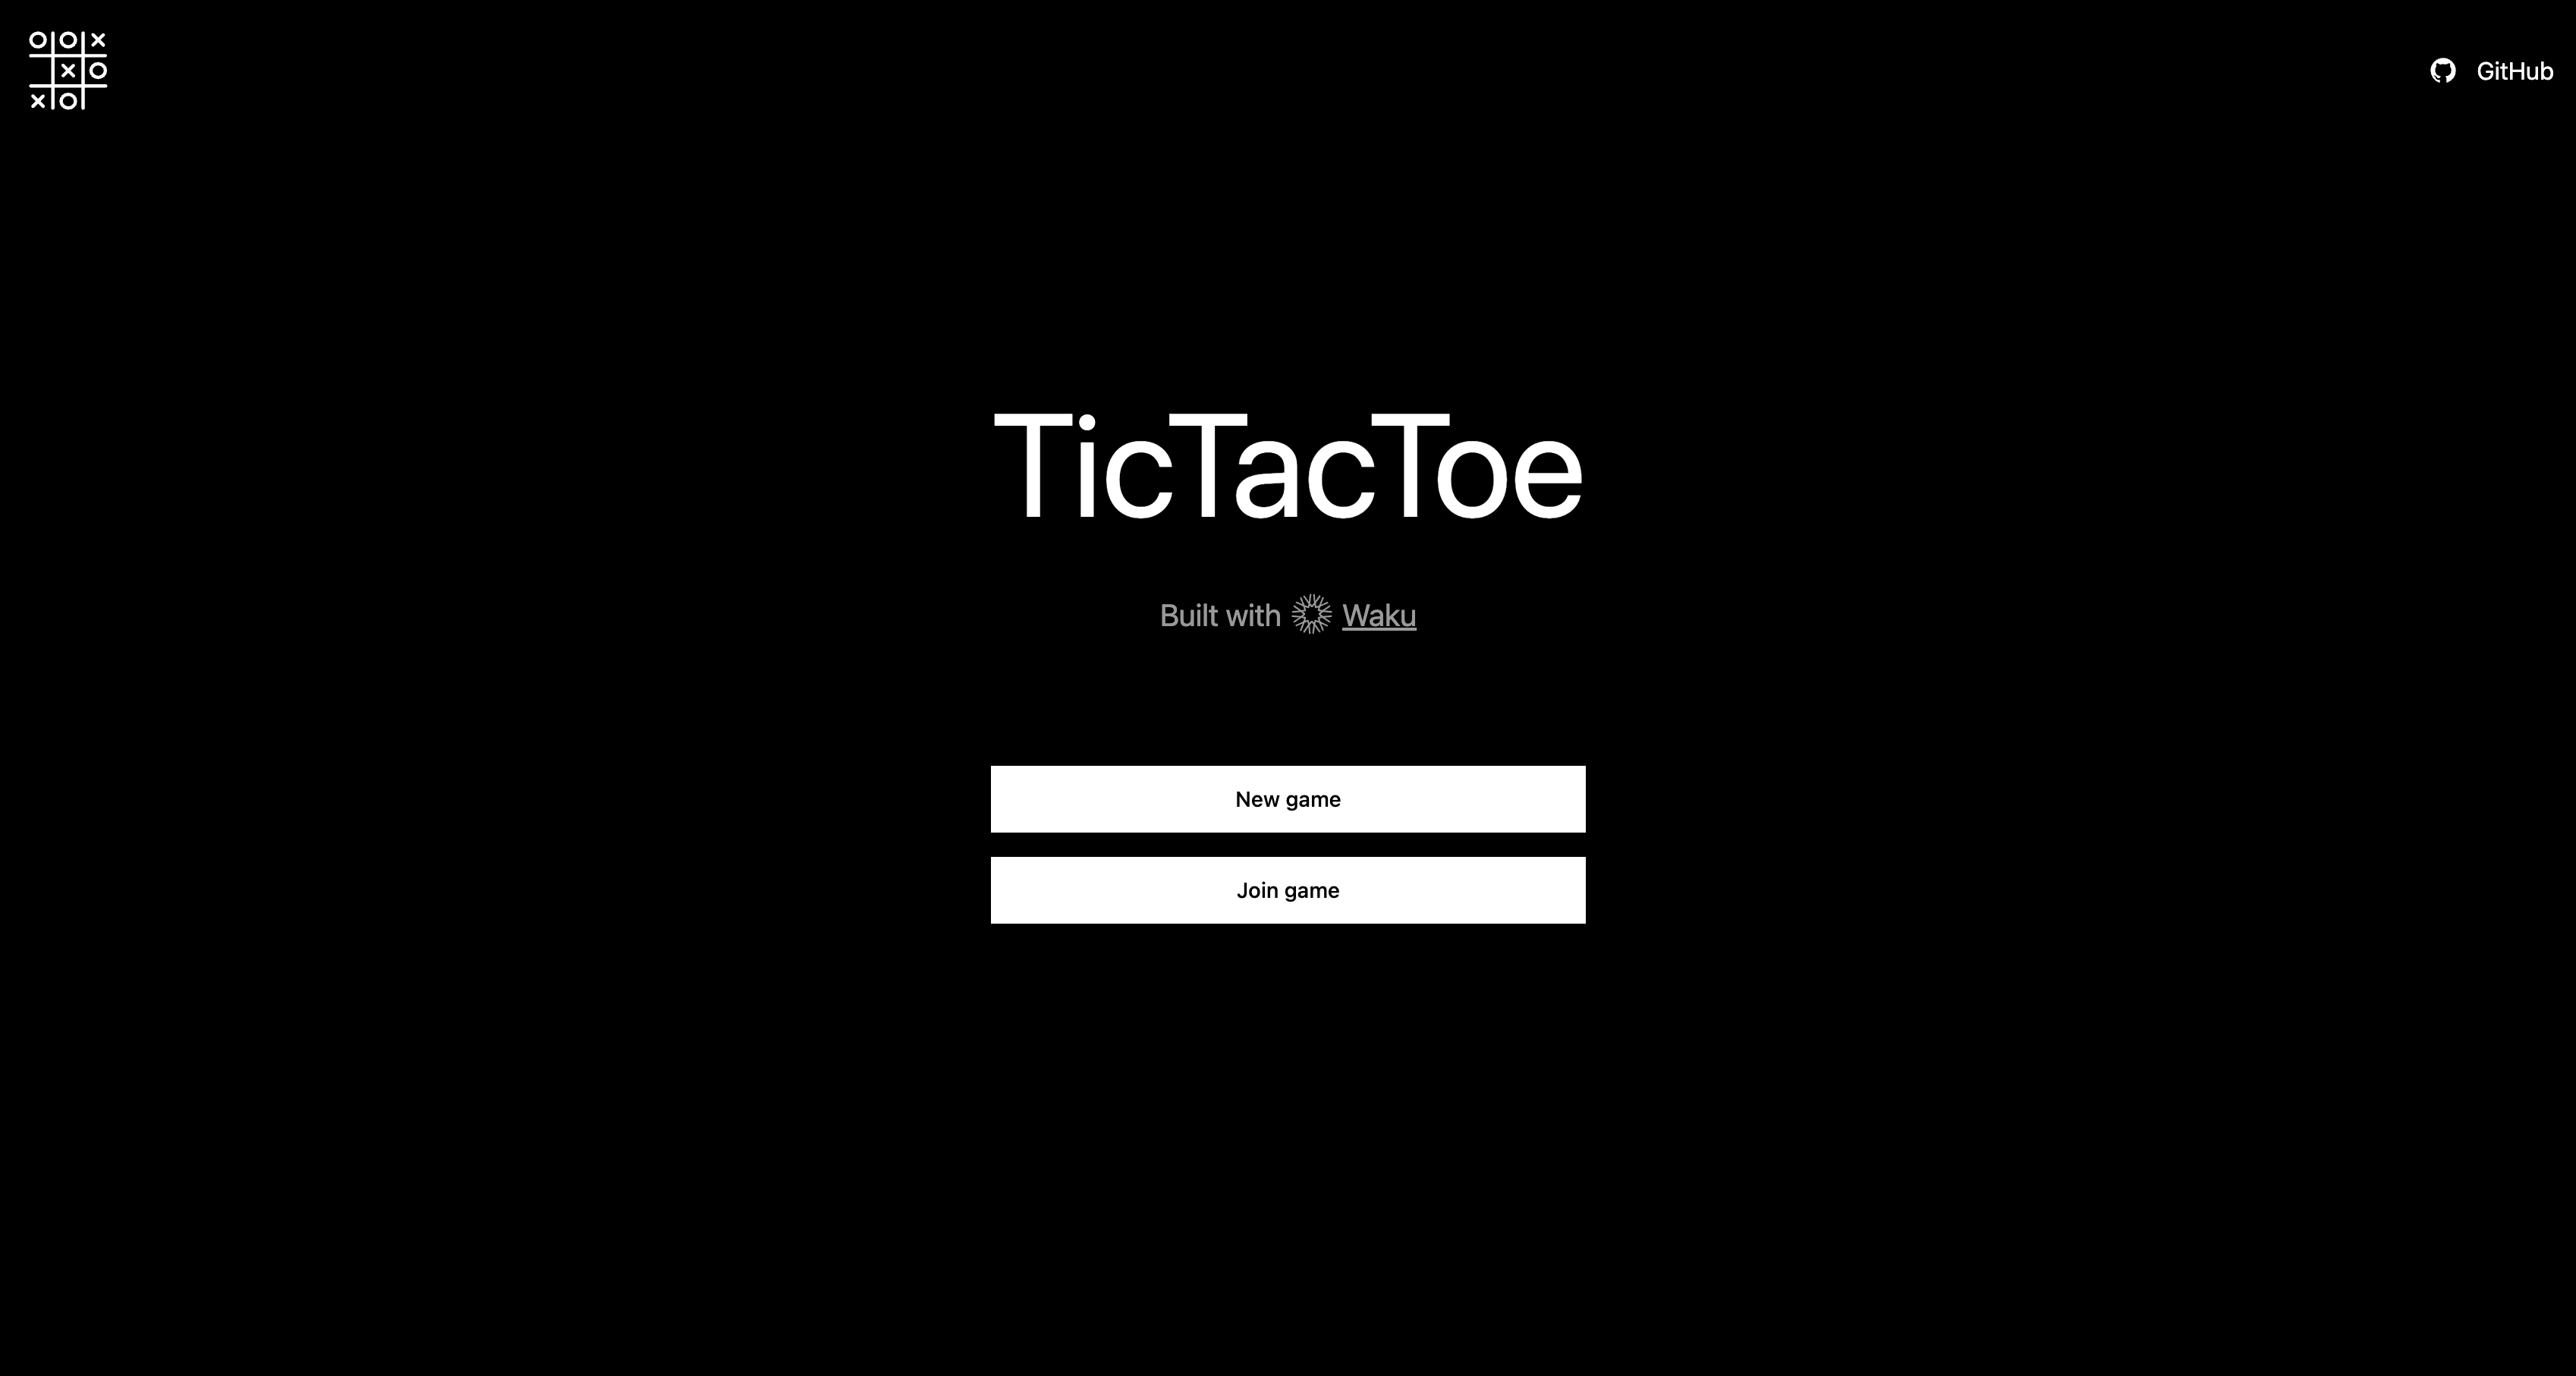
<h1 className="text-3xl sm:text-8xl text-white">TicTacToe</h1>
<div className='mt-8 sm:text-xl/relaxed text-white opacity-60 flex items-center justify-center'>
<p>Built with</p>
<img src='https://waku.org/theme/image/logo.svg' />
<a href='https://waku.org' className='underline'>
Waku
</a>
</div>
{game === null && (
<div className="mt-20 flex flex-wrap justify-center gap-4">
<button
className="block w-full bg-white px-12 py-3 text-sm font-medium hover:text-white hover:bg-black hover:border-2 hover:border-white focus:outline-none focus:ring text-black"
onClick={handleNewGameClick}
>
New game
</button>
<button
onClick={handleJoinGameClick}
className="block w-full bg-white px-12 py-3 text-sm font-medium hover:text-white hover:bg-black hover:border-2 hover:border-white focus:outline-none focus:ring text-black"
>
Join game
</button>
</div>
)}
{game === 'join' && (
<div className="mt-20 space-y-4">
<input
value={joinLink}
onChange={handleJoinLinkChange}
className="px-3 py-3 border-2 border-white w-full"
placeholder='Enter the game link'
/>
<div className='flex space-x-5 items-center'>
<button
onClick={handleJoinButtonClick}
className="block w-full bg-white px-12 py-3 text-sm font-medium hover:text-white hover:bg-black hover:border-2 hover:border-white focus:outline-none focus:ring text-black"
>
Join game
</button>
<button
onClick={handleGoBackClick}
className="block w-full bg-white px-12 py-3 text-sm font-medium hover:text-white hover:bg-black hover:border-2 hover:border-white focus:outline-none focus:ring text-black"
>
Go back
</button>
</div>
</div>
)}
</div>
</div>
</section>
);
}
The above code leverages common React hooks like useState() and useEffect() to keep the app state and react to state changes. Summarising the above code, the state variable game will decide if the user wants to join an existing game or create a new game. ShortUniqueId() function will be used for generating a room ID if the user wants to create a new game.
For the app's simplicity, the user creating the game will always be 'player X', and the user joining the game will be 'player O'. The session storage will hold the player as X or O and can be retrieved from the player item.
Step 7 : Sending and retrieving messages in Room.js
The Room.js file will have all the code related to sending and subscribing to the messages in the content topic. This file will also include other miscellaneous stuff like the winning conditions, the player to make a move, finding if an opponent has joined the game and finally, finding the winner.
Firstly, let us make all the required imports :
import React, { useState, useEffect } from 'react';
import Link from 'next/link';
import copy from 'copy-to-clipboard';
import protobuf from 'protobufjs';
import {
  useWaku,
  useContentPair,
  useLightPush,
  useStoreMessages,
  useFilterMessages,
} from '@waku/react';
import { message } from '@waku/core';
import Loading from './Loading';
After this , we use a Protobuff object to define the structure of the messages like below :
const ChatMessage = new protobuf.Type('ChatMessage')
  .add(new protobuf.Field('timestamp', 1, 'uint64'))
  .add(new protobuf.Field('sender', 2, 'string'))
  .add(new protobuf.Field('message', 3, 'string'));
Next, let us set up encoder and decoder:
const { decoder, encoder } = useContentPair();
Initializing LightPush, Filter and Store can be done in a very few lines of code :
  const { messages: storeMessages } = useStoreMessages({
    node,
    decoder,
  });

  const { messages: filterMessages } = useFilterMessages({ node, decoder });

  const { push } = useLightPush({ node, encoder });
With all these set up, sending a message into a content topic is completed. Here's how your sendMessage() function should look like :
  async function sendMessage(sender, message) {
    const protoMessage = ChatMessage.create({
      timestamp: Date.now(),
      sender,
      message,
    });

    const serialisedMessage = ChatMessage.encode(protoMessage).finish();

    const timestamp = new Date();
    await push({
      payload: serialisedMessage,
      timestamp,
    });

    console.log('MESSAGE PUSHED');
  }
To setup the decodeMessage() function, you will have to pass the wakuMessage option into the function and use the ChatMessage.decode() function with the required parameters. Here's the code :
  function decodeMessage(wakuMessage) {
    if (!wakuMessage.payload) return;

    const { timestamp, sender, message } = ChatMessage.decode(wakuMessage.payload);

    if (!timestamp || !sender || !message) return;

    const time = new Date();
    time.setTime(Number(timestamp));

    return {
      message,
      timestamp: time,
      sender,
      timestampInt: wakuMessage.timestamp,
    };
  }
Step 8 : Winning conditions and finding the winner with UseEffect()
We will use the useEffect() hook to retrieve and map the messages from the contentTopic. After this, we also use the winning combinations to find the winner between the two players :
// Finding if the players have joined the room
  useEffect(() => {
    if (node !== undefined) {
      if (player === false) {
        const p =
          sessionStorage.getItem('roomId') == props.room && sessionStorage.getItem('player') == 'x'
            ? 'x'
            : 'o';

        setPlayer(p);
        if (p === 'o') {
          sendMessage('o', 'joined');
        }
      }
      setNodeStart(true);
    }
  }, [node]);

// Defining the winning condition and
  useEffect(() => {
    let messages = storeMessages.concat(filterMessages);

    let b = {};
    let o = false;

    messages = messages.map((message) => decodeMessage(message));

    messages.forEach((message) => {
      if (message.message === 'joined') {
        o = true;
        return;
      }
      if (message.message === 'winner') {
        return;
      }

      b = { ...b, [message.message]: message.sender };
    });

    const winningCombinations = [
      ['1', '2', '3'],
      ['4', '5', '6'],
      ['7', '8', '9'],
      ['1', '4', '7'],
      ['2', '5', '8'],
      ['3', '6', '9'],
      ['1', '5', '9'],
      ['3', '5', '7'],
    ];

    let winner = null;
    let temp = null;
    let winningPattern = null;

    winningCombinations.forEach((combination) => {
      if (winner !== null) {
        return;
      }
      for (let [i, c] of combination.entries()) {
        if (b[c] === undefined) {
          temp = null;
          break;
        } else {
          if (temp === null) {
            temp = b[c];
            continue;
          } else {
            if (temp === b[c]) {
              if (i === 2) {
                winner = temp;
                winningPattern = combination;
              }
              continue;
            }
          }
        }
      }
    });

    setWinner(winner);
    setWinningPattern(winningPattern);
    setOpponentJoined(o);
    setBoxes(b);
  }, [storeMessages, filterMessages]);
The game will automatically end if a winning condition is met by one of the users.
Step 9 : Loading component and rendering the boxes
The loading component will be visible if the node is not started or if an opponent player has not joined the room yet.
  if (!nodeStart || !player || opponentJoined === null) {
    return <Loading />;
  }
Here's the code for Loading.js component :
import React from 'react'

export default function Loading() {
    return (
        <div className='h-screen bg-black flex items-center w-full justify-center'>
            <svg width="60" height="60" viewBox="0 0 24 24" xmlns="http://www.w3.org/2000/svg">
                <g fill="none" stroke="#ffffff" stroke-linecap="round" stroke-width="2">
                    <path stroke-dasharray="60" stroke-dashoffset="60" stroke-opacity=".3" d="M12 3C16.9706 3 21 7.02944 21 12C21 16.9706 16.9706 21 12 21C7.02944 21 3 16.9706 3 12C3 7.02944 7.02944 3 12 3Z">
                        <animate fill="freeze" attributeName="stroke-dashoffset" dur="1.3s" values="60;0" />
                    </path>
                    <path stroke-dasharray="15" stroke-dashoffset="15" d="M12 3C16.9706 3 21 7.02944 21 12">
                        <animate fill="freeze" attributeName="stroke-dashoffset" dur="0.3s" values="15;0" />
                        <animateTransform attributeName="transform" dur="1.5s" repeatCount="indefinite" type="rotate" values="0 12 12;360 12 12" />
                    </path>
                </g>
            </svg>

        </div>
    )
}
After you are done setting up the loading component, it's time to write a function that will handle rendering the boxes. This function will be used as an onClick handler that will send either x or o based on the player who clicks the box. It will also render the boxes with x or o based on the player who has clicked the box previously. Here's the function :
  function renderBoxes() {
    let boxElements = [];
    for (let i = 1; i < 10; i += 1) {
      if (boxes[i] === undefined) {
        boxElements.push(
          <div
            onClick={() => handlePlay(i.toString())}
            className='w-20 h-20 border-2 border-white flex items-center justify-center text-2xl text-white'
          ></div>
        );
      } else {
        if (boxes[i] === 'x') {
          boxElements.push(
            <div className='w-20 h-20 border-2 border-white flex items-center justify-center text-2xl text-white'>
              X
            </div>
          );
        } else {
          boxElements.push(
            <div className='w-20 h-20 border-2 border-white flex items-center justify-center text-2xl text-white'>
              O
            </div>
          );
        }
      }
    }
    return <div id='tiles' className='grid grid-cols-3 grid-rows-3 gap-3 mt-10'>{boxElements}</div>;
  }
The above renderBoxes() function will render only the box grid. We also need some prompts to mention which user should be playing their move (X or Y) and also announce the winner. For this, here's a simple UI that you can return in the Room function :
    <section id='room'>
      <div className='flex justify-end mr-5 text-white space-x-5 items-center'>
        <p>Waku status : active</p>

        <svg width='20' height='20' viewBox='0 0 48 48' xmlns='http://www.w3.org/2000/svg'>
          <g fill='none' stroke='currentColor' strokeWidth='4'>
            <path d='M13.5 39.37A16.927 16.927 0 0 0 24 43c3.963 0 7.61-1.356 10.5-3.63M19 9.747C12.051 11.882 7 18.351 7 26c0 1.925.32 3.775.91 5.5M29 9.747C35.949 11.882 41 18.351 41 26c0 1.925-.32 3.775-.91 5.5' />
            <path strokeLinecap='round' strokeLinejoin='round' d='M43 36c0 1.342-.528 2.56-1.388 3.458A5 5 0 1 1 43 36Zm-28 0c0 1.342-.528 2.56-1.388 3.458A5 5 0 1 1 15 36ZM29 9c0 1.342-.528 2.56-1.388 3.458A5 5 0 1 1 29 9Z' />
          </g>
        </svg>
        <p>Peers : {node?.libp2p?.getPeers()?.length ?? '-'}</p>
      </div>

      <div className='mx-auto max-w-screen-xl px-4 mt-20 lg:flex lg:h-mt-40 lg:items-center'>
        <div className='mx-auto max-w-xl'>
          <div className='flex space-x-2 text-white opacity-60 mb-5 items-center'>
            <Link href='/'>
              <svg width='20' height='20' viewBox='0 0 1024 1024' xmlns='http://www.w3.org/2000/svg'>
                <path fill='currentColor' d='M224 480h640a32 32 0 1 1 0 64H224a32 32 0 0 1 0-64z' />
                <path
                  fill='currentColor'
                  d='m237.248 512l265.408 265.344a32 32 0 0 1-45.312 45.312l-288-288a32 32 0 0 1 0-45.312l288-288a32 32 0 1 1 45.312 45.312L237.248 512z'
                />
              </svg>
            </Link>
            <p>Game URL</p>
          </div>
          <div className='px-3 py-3 text-center flex border-2 border-white text-white underline items-center justify-between'>
            <p>https://waku-xo.vercel.app/game/{props.room}</p>
            <button onClick={() => copy(`https://waku-xo.vercel.app/game/${props.room}`)}>
              <svg width='20' height='20' viewBox='0 0 256 256' xmlns='http://www.w3.org/2000/svg'>
                <path
                  fill='currentColor'
                  d='M216 32H88a8 8 0 0 0-8 8v40H40a8 8 0 0 0-8 8v128a8 8 0 0 0 8 8h128a8 8 0 0 0 8-8v-40h40a8 8 0 0 0 8-8V40a8 8 0 0 0-8-8Zm-56 176H48V96h112Zm48-48h-32V88a8 8 0 0 0-8-8H96V48h112Z'
                />
              </svg>
            </button>
          </div>

          <h1 className='text-3xl sm:text-4xl text-white mt-20'>
            {!opponentJoined && 'Waiting for opponent to join'}
            {winner == null &&
              opponentJoined &&
              (Object.keys(boxes).length % 2 === 0
                ? player === 'x'
                  ? 'Your turn'
                  : "Opponent's turn"
                : player === 'o'
                ? 'Your turn'
                : "Opponent's turn")}
            {winner != null && (winner === 'x' ? 'X is winner' : 'O is winner')}
          </h1>
{
!winner &&
          <div className='flex justify-center'>{renderBoxes()}</div>
}
        </div>
      </div>
    </section>
Step 10 : Rendering the room
Room.js is quite a big chunk of code, right? But don't worry - it is easy to follow up and the final code can be found here.
There is one final step before our TicTacToe is complete. It is to create the game/[id].js page component. This component will render the room based on the room id provided on the URL. We use the useRouter() hook to query the room id from the URL and then render the Room component :
import Header from '@/components/Header'
import Room from '@/components/Room'
import React, { useState, useEffect } from 'react'
import Loading from '@/components/Loading';
import { useRouter } from 'next/router'


// Waku imports
import { ContentPairProvider, useWaku } from "@waku/react";

// Misc imports
import ShortUniqueId from 'short-unique-id';

export default function Game() {

    const router = useRouter();
    const room = router.query.id;

    return (
        <>
            <ContentPairProvider
                contentTopic={"/tictactoe/" + room}
            >
                <div className='bg-black h-screen'>
                    <Header />
                    <Room room={room} />
                </div>
            </ContentPairProvider>
        </>
    )
}
What's next?
I hope that your TicTacToe application with Waku will be up and running now. If you are still stuck at part of the above 10 steps, please refer to our example repository now. You can also try out the TicTacToe game in this link.
Please note that this is a very basic demonstration of using Waku's react hooks to build a TicTacToe game. The game still needs a lot of improvements in terms of handling the connection, establishing the winning , etc.
Here are some ideas for you to include in the future:
adding P2E (Play to Earn) mechanisms where users can connect their wallet, stake some crypto and then the winner gets the stake.
adding names for players
minting an NFT for the winner once a game is over
With Waku, the possibilities are limitless. Go ahead and start building! If you have any questions, feel free to drop us a messafe in our support channel on the Waku discord community.